POWER BETRAYAL: DIAGNOSING AND CONQUERING LOW OUTPUT FROM YOUR OFF-GRID SOLAR SYSTEM
The night had been bitter cold – ten below zero with howling winds that drove the chill factor down to God-knows-what. Morning revealed a blanket of snow and a system that should have been pumping 3,000 watts delivering a pathetic trickle. No power for heat. No power for comms. The nearest help was twenty miles away through snowdrifts, and the battery bank was draining fast. As I climbed onto the roof with multimeter in hand, the bitter wind cutting through my layers, one thought kept pounding: find the problem or freeze. This wasn't some weekend-warrior inconvenience – this was survival. No utility company to call. No backup grid to switch to. Just me, a failing system, and the brutal indifference of winter.
When you've committed to the off-grid life, a solar system that suddenly outputs at a fraction of its capacity isn't just an annoyance—it's a threat to your freedom, your comfort, and sometimes your life itself. Troubleshooting low power output in your off-grid solar system isn't a luxury skill; it's essential knowledge for anyone serious about energy independence.
The mainstream solar companies don't tell you this ugly truth: even the most expensive systems will eventually underperform if you don't know how to diagnose and fix the problems yourself. They'd rather have you dependent on their service technicians—if they even bother to send someone to your remote location—than empower you with the knowledge to maintain your energy sovereignty.
I've lived this nightmare more than once. The system that promised freedom becoming a prison of anxiety as the batteries drain and the panels sit there, useless against the sky. But I've learned that with the right diagnostic approach, almost every solar power problem can be identified and fixed without calling in the cavalry.
THE COMFORT ZONE: WHEN YOUR SYSTEM SEEMS BULLETPROOF
Most of us start our off-grid journey with an almost religious faith in our solar setup. The panels are mounted, the batteries are connected, the inverter hums with reassuring confidence. Everything works as promised, and we begin to take for granted the miracle of pulling electricity from sunlight.
I remember that first year at my homestead—watching the charge controller's steady green light, seeing the battery monitor showing a comfortable 90% charge most days. I'd built a system with 20% more capacity than my calculated needs. Overkill, I thought. Better safe than sorry.
The system was my pride. Sixteen 390-watt panels, a premium MPPT charge controller, a 48V lithium battery bank with 20kWh of usable capacity, and a pure sine wave inverter that could handle my entire cabin's needs. It wasn't cheap, but freedom rarely is.
For months, everything worked flawlessly. I'd check the system's performance occasionally, but mostly I just enjoyed the independence, the quiet confidence of knowing I wasn't tethered to the failing grid like everyone else. I grew complacent.
THE DISRUPTION: WHEN YOUR POWER PRODUCTION PLUMMETS
The trouble started subtly. I noticed my battery bank wasn't hitting full charge as consistently. Then came days when it would barely reach 80% despite full sunshine. Soon, I was having to run my generator more frequently to supplement the dwindling solar harvest.
By the time winter arrived, my system was producing less than half its rated capacity. What had been a robust 6,000 watt system on paper had dwindled to barely 2,500 watts on the best days. On cloudy days, it was pitiful.
The wake-up call came during that brutal cold snap I described earlier. When overnight temperatures plunged below zero, my heating system drew down the batteries faster than I'd anticipated. I woke to a system in trouble—batteries at 30% and barely any power coming in despite clear skies.
This wasn't just an inconvenience anymore. This was potentially life-threatening.
THE REALIZATION: SOLAR SYSTEMS FAIL IN PREDICTABLE WAYS
As I frantically began trying to diagnose the problem, a critical realization dawned: solar systems don't typically fail catastrophically all at once. Instead, they degrade in predictable patterns. And each component in the system leaves diagnostic clues—if you know how to read them.
I'd made the classic off-grid rookie mistake. I'd invested thousands in equipment but almost nothing in maintenance knowledge and diagnostic tools. I'd been seduced by the promise of "set it and forget it" that so many solar salespeople push to close the deal.
But here's the brutal truth they don't tell you: ALL solar systems require monitoring, maintenance, and occasional troubleshooting. The question isn't if your system will underperform, but when—and whether you'll know what to do about it.
This insight was both terrifying and empowering. Terrifying because I realized how vulnerable I'd been all along. Empowering because I understood that with the right approach, I could diagnose and fix almost any solar problem myself.
THE RISING CONFLICT: FACING THE DIAGNOSTIC CHALLENGE
With batteries draining and temperatures dropping, I faced a complex system with multiple potential failure points. Where do you even start when your panels are producing a fraction of their capacity?
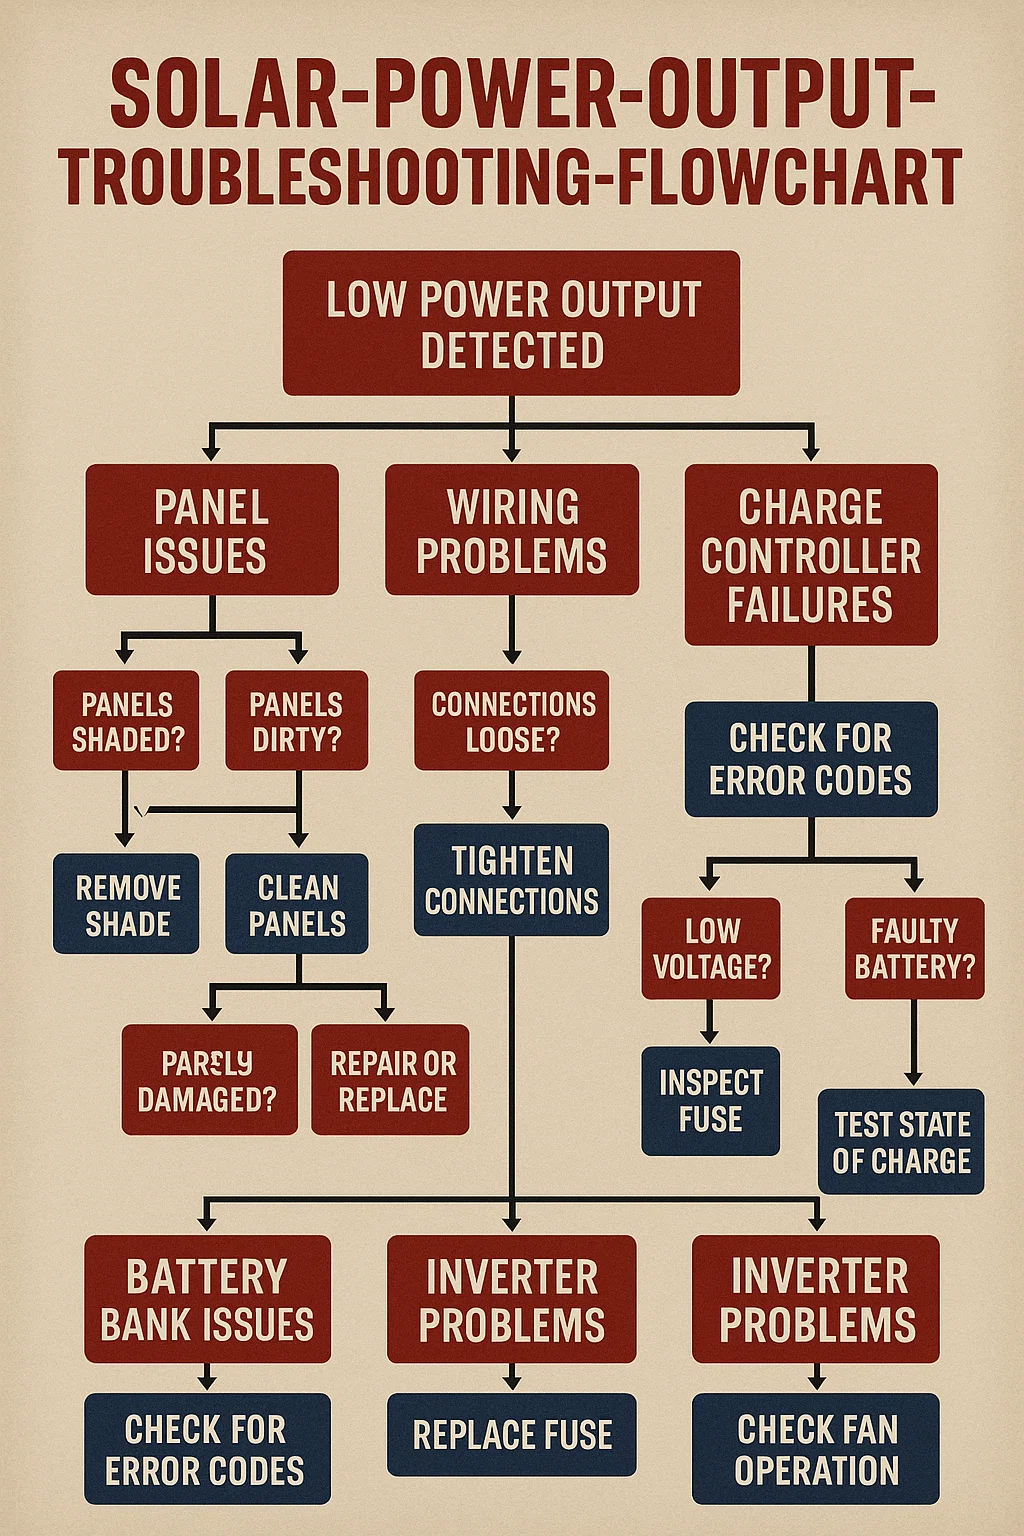
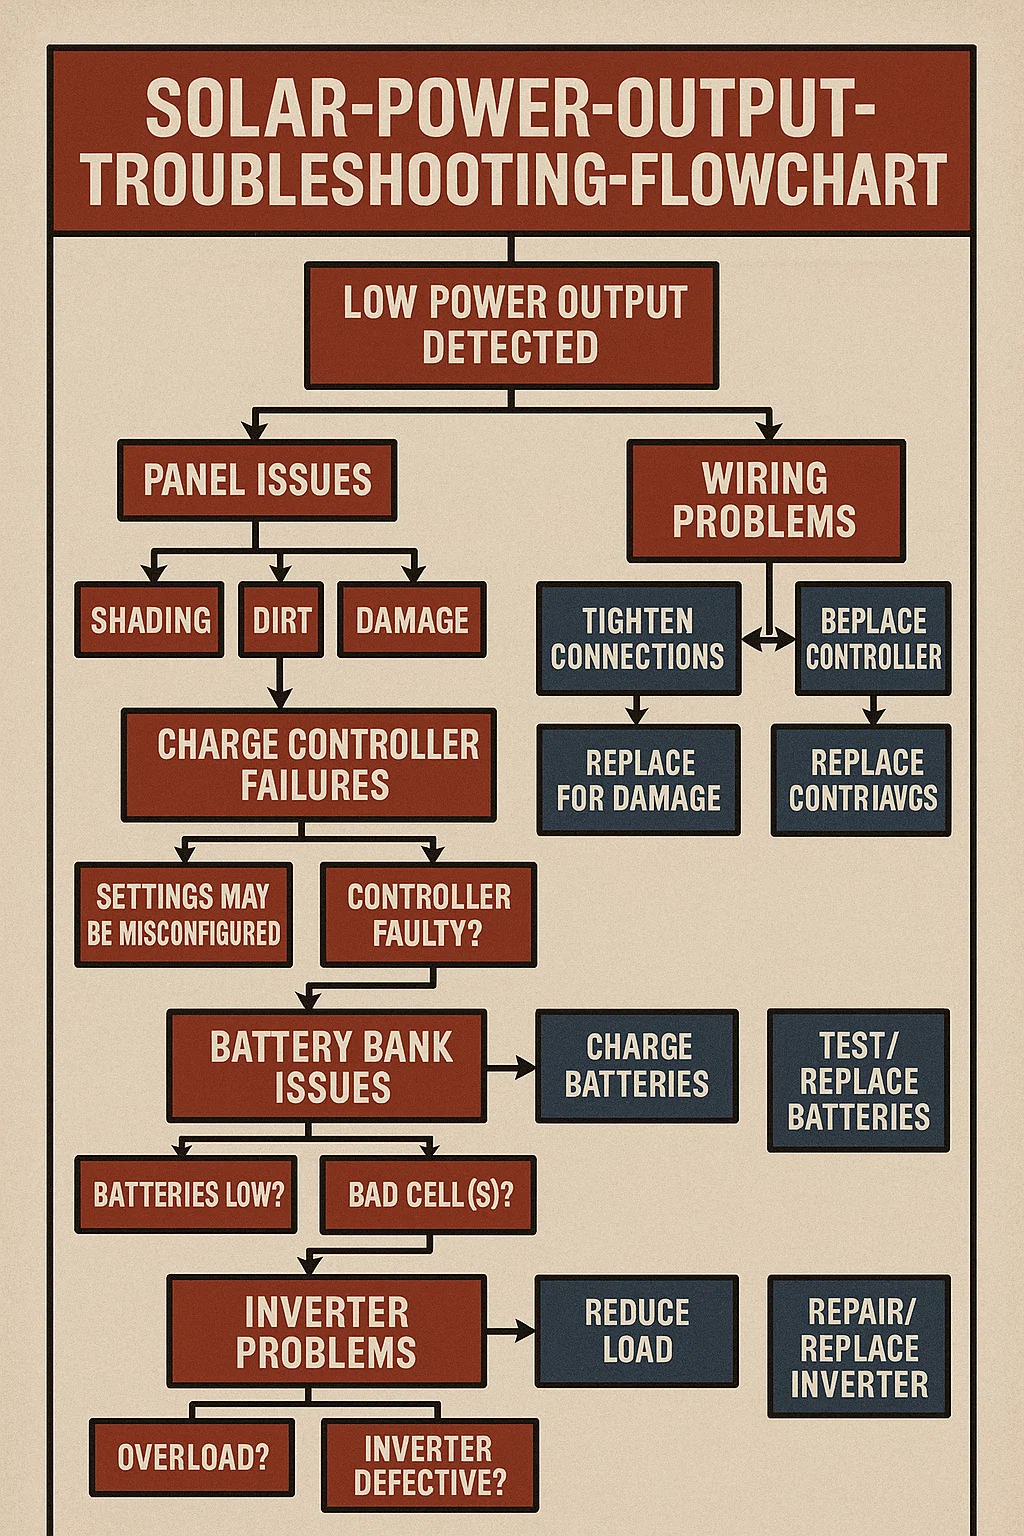
I could see five major categories where the problem might lie:
COMMON CAUSES OF LOW SOLAR OUTPUT
1. Panel Issues: Physical damage, shading, snow/dirt coverage, degradation, or orientation problems
2. Wiring Problems: Loose connections, corroded terminals, damaged cables, or improper fusing
3. Charge Controller Failures: Programming errors, overheating, or component failure
4. Battery Bank Issues: Individual cell failure, improper settings, or end-of-life capacity loss
5. Environmental Factors: Unexpected shading, extreme temperatures affecting efficiency, or reflectivity changes
The problem could be in any—or several—of these areas. Without a systematic approach, I'd be shooting in the dark, potentially wasting precious time and battery reserve on the wrong diagnosis.
I remembered something my grandfather, an old-school electrician, used to say: "Electricity is like water. If you want to find a leak, you follow the flow and measure at each junction."
That was it. I needed to trace the power from the panels to the batteries, measuring at each connection point to find where the expected values didn't match reality.
THE CHOICE: ARMING YOURSELF WITH KNOWLEDGE AND TOOLS
I realized I had two options: wait for help that might take days to arrive, or solve this myself. For anyone truly committed to off-grid independence, that's no choice at all.
I gathered the diagnostic tools I'd need:
- Multimeter: Essential for measuring voltage and current at different points
- Infrared Thermometer: To identify hot spots in panels or connections
- Compass and Inclinometer App: To verify panel orientation and tilt
- Wire Brush and Contact Cleaner: For cleaning connections
- Basic Hand Tools: Screwdrivers, wrenches, socket set
- Safety Equipment: Insulated gloves, eye protection, non-conductive tools
With tools in hand and a systematic approach in mind, I was ready to track down the problem—wherever in the system it might be hiding.
THE TRIAL BY FIRE: SYSTEMATIC DIAGNOSIS UNDER PRESSURE

There's something uniquely clarifying about troubleshooting your power system when your survival literally depends on finding the problem. My approach was methodical, moving from the panels downward through the system. Here's the process I followed—the same one that's saved my bacon multiple times since:
SAFETY FIRST
Solar arrays generate deadly voltage even in low light conditions. Always disconnect breakers/fuses before handling connections. Batteries can deliver lethal current. Use insulated tools, remove metal jewelry, and wear appropriate protection.
STEP 1: VISUAL INSPECTION OF PANELS AND ARRAYS
I started with the obvious, trudging through snow to check each panel. Three of my sixteen panels were completely covered in snow that had been blown against them during the night. While that explained some loss, it couldn't account for the severe drop in production.
Looking closer, I spotted something concerning on one of the panels—a small crack in the corner, with moisture visibly penetrating the laminate. Another panel showed discoloration—a yellowing of the encapsulant material that suggested UV degradation.
I cleared all snow and made detailed notes of panel condition, but kept looking. These issues would need addressing eventually, but they couldn't explain the massive underperformance I was experiencing.
STEP 2: TESTING OPEN CIRCUIT VOLTAGE (Voc) AT THE PANELS
With the combiner box open, I disconnected the array and used my multimeter to check the open circuit voltage of each string. Here was my first significant clue: String #2 was reading only 162V when it should have been closer to 240V. The other strings were within expected parameters.
Next, I isolated the individual panels in String #2. Panel #8 showed a Voc of just 21V instead of the expected 40V. Panel #9 was even worse—showing only 14V.
This indicated either severe internal damage to these panels or a major connection issue. I traced the wiring between these panels, feeling for temperature differences and checking the MC4 connectors.
STEP 3: CHECKING CONNECTION POINTS AND WIRING
Bingo. As I inspected the connection between panels #8 and #9, I found the problem. The MC4 connector was loose, and worse, there was visible corrosion on the metal contacts. A tiny gap had allowed moisture to penetrate and create galvanic corrosion, increasing resistance and dramatically reducing power flow.
When I pulled apart the connector, I found the metal contact was nearly severed by corrosion. This single bad connection was effectively taking four of my panels offline due to the series wiring configuration.
But I wasn't done. While this explained much of the problem, my voltage readings on other strings still seemed slightly lower than optimal. I continued the systematic inspection.
STEP 4: CHARGE CONTROLLER INSPECTION
Moving to the charge controller, I checked the settings and input/output readings. The controller was correctly configured, but I noticed the heatsink was unusually hot to the touch. The unit was mounted in a small, poorly ventilated electrical box.
When components overheat, they often throttle performance to protect themselves. My MPPT controller was likely reducing its power handling capacity due to inadequate cooling—an issue made worse by the fact that I was drawing heavy loads for heating.
This was a design flaw in my system installation, but one I could address immediately by temporarily improving ventilation to the controller.
STEP 5: BATTERY BANK ASSESSMENT
Finally, I checked each battery in the bank, measuring voltage and performing a load test where possible. All cells seemed to be functioning properly, though the overall bank was severely depleted due to the ongoing issues with energy production.
This confirmed my suspicion: the problem wasn't with energy storage but with energy production and conversion.
THE FIRST VICTORY: IMPLEMENTING IMMEDIATE SOLUTIONS
Armed with a clear diagnosis, I implemented a three-part solution:
First, I replaced the corroded MC4 connector with a spare from my emergency kit. This immediately brought four panels back online, boosting production by nearly 1,500 watts. Always keep spare connectors—they're cheap insurance against catastrophic system failure.
Second, I improved ventilation for the charge controller by removing the enclosure cover and positioning a small battery-powered fan to increase airflow. This wasn't a permanent solution, but it allowed the controller to operate at full capacity without thermal throttling.
Third, I cleaned all panel surfaces thoroughly, removing light snow and dust accumulation that had been subtly reducing efficiency across the entire array.
The results were immediate and dramatic. System output jumped from 2,500 watts to nearly 5,700—not quite the rated 6,240 watts, but more than double what I'd been getting and enough to rapidly recharge my batteries.
As the battery monitor showed the charge percentage climbing again, the sense of relief was indescribable. I'd faced down a potentially life-threatening situation and conquered it through knowledge and systematic troubleshooting.
THE TRANSFORMATION: FROM REACTIVE TO PROACTIVE MAINTENANCE
That winter crisis changed my relationship with my solar system forever. I went from a passive consumer who expected the technology to "just work" to an active participant in its operation and maintenance.
In the weeks that followed, I implemented a comprehensive maintenance and monitoring protocol:
PROACTIVE SOLAR SYSTEM MAINTENANCE PROTOCOL
Daily: Check system performance metrics against expected values
Weekly: Visual inspection of panels, connections, and equipment
Monthly: Clean panels, check all connection points for tightness and corrosion
Quarterly: Full system diagnostic check with voltage/amperage measurements
Annually: Comprehensive inspection of all components, including thermal imaging if possible
I also created a proper documentation system—a weatherproof binder with system specifications, expected voltage/amperage readings at each junction, maintenance logs, and a troubleshooting decision tree like the one pictured earlier in this article.
Perhaps most importantly, I built a proper emergency kit with spare parts for every critical connection and component in the system: MC4 connectors, fuses of various ratings, a spare charge controller, basic electrical tools, and detailed repair instructions.
The peace of mind this preparation brings is priceless. I'm no longer at the mercy of a system I don't fully understand. I'm its master, capable of diagnosing and addressing issues before they become emergencies.
THE CALL TO OTHERS: MASTER YOUR SYSTEM OR IT WILL MASTER YOU
If you're serious about off-grid living, there's no room for magical thinking when it comes to your power system. Solar is incredible technology, but it doesn't maintain itself. The grid-tied masses can afford to be ignorant about how their electricity works—they have a massive corporation to call when things go wrong. You don't.
Here's my hard-earned advice for those committed to energy independence:
1. INVEST IN DIAGNOSTIC TOOLS
Don't cheap out on measuring equipment. A quality multimeter and infrared thermometer are as essential as any component in your solar array. These tools allow you to see what's happening in your system beyond what any monitoring software can tell you.
Recommended: The Fluke 117 multimeter and FLIR TG267 thermal camera have paid for themselves many times over in my setup.
2. CREATE A SYSTEM MAP WITH EXPECTED VALUES
Document your entire system with a detailed diagram showing all components and connection points. For each junction, note the expected voltage and amperage ranges under different conditions. When troubleshooting, this reference map is invaluable for quickly identifying deviations from normal operation.
3. IMPLEMENT REGULAR PREVENTATIVE MAINTENANCE
Don't wait for problems to appear. Scheduled maintenance prevents most common issues that cause low power output. Create a calendar with daily, weekly, monthly, and annual maintenance tasks, and stick to it religiously.
Simple actions like checking connection tightness, cleaning panels, and monitoring for hot spots can prevent 90% of the problems that lead to system failure.
4. BUILD A COMPREHENSIVE SPARE PARTS KIT
When you're miles from the nearest supplier, waiting a week for a $5 connector isn't just inconvenient—it could be dangerous. Stock these essentials:
- MC4 connectors (male and female)
- Assorted fuses for your specific system
- Diodes for bypass/blocking applications
- Battery terminal cleaners and protectant spray
- High-quality electrical tape and wire nuts
- Spare lengths of appropriate gauge wire
- Heat shrink tubing in various sizes
5. UNDERSTAND YOUR SPECIFIC SYSTEM'S VULNERABILITIES
Every solar setup has its own potential weak points. Some charge controllers are prone to firmware glitches. Certain panel brands may have common failure modes. Some battery chemistries are sensitive to specific conditions.
Research your exact equipment to understand its typical failure patterns. Forums dedicated to off-grid living are goldmines for this information—the collective experience of thousands of system owners can help you anticipate and prevent problems specific to your components.
THE POWER OF KNOWLEDGE: YOUR ULTIMATE OFF-GRID INSURANCE
The corporate energy structure doesn't want self-sufficient people who can diagnose and fix their own power systems. They want dependent consumers who call the experts—and pay handsomely—whenever something goes wrong.
True independence requires more than just purchasing components and having them installed. It demands that you understand your system intimately, maintain it diligently, and possess the knowledge to troubleshoot low output when it inevitably occurs.
My system now runs at peak efficiency nearly all the time. When performance does drop, I can usually identify and address the cause within hours, often before it impacts my daily life. That's not luck—it's the result of deliberate learning and systematic maintenance.
The next time your system betrays you with unexpectedly low output, you have a choice: panic and pray for help, or methodically track down the problem and fix it yourself. The difference between these paths is nothing more than knowledge and preparation.
Your off-grid lifestyle is a declaration of independence. Don't compromise that independence by remaining ignorant about the technology that powers your freedom. Master your system, or it will inevitably master you—usually at the worst possible moment.
The choice, as always, is yours. Choose wisely. Your freedom depends on it.
TAKE CONTROL OF YOUR POWER SYSTEM TODAY