POWER REVOLUTION: THE UNCENSORED SOLAR ENERGY DIY STARTER'S GUIDE THEY DON'T WANT YOU TO READ
The neighborhood had been dark for three days since the grid went down. As I flipped the switch connecting my homemade solar system to the house circuits, a warm yellow light flooded my kitchen. Outside, the street remained pitch black—houses full of people waiting helplessly for some faceless corporation to restore their power. Through the window, I could see my neighbor Tom trudging over, drawn like a moth to the only light for blocks. "How the hell do you have electricity?" he asked, eyes wide with disbelief. I smiled and popped open two cold beers from my still-running refrigerator. "Because six months ago, I stopped waiting for permission and built it myself." The system wasn't fancy—just four panels, some batteries I'd wired together, and components I'd pieced together from online guides—but in that moment, it was the difference between being a victim and being sovereign.
The big energy companies don't want you to know this, but building your own solar energy DIY system isn't rocket science. They've created an artificial mystique around solar power—a smokescreen of complexity and fear meant to keep you dependent on their overpriced installation services and ever-increasing monthly bills.
I'm here to rip away that curtain. To show you that with basic tools, some weekend determination, and this uncensored starter's guide, you can join the silent revolution of Americans taking their power back—literally and figuratively.
This isn't just about saving a few bucks, though you certainly will. This is about something far more valuable: freedom. When the grid fails (and it will), when the bills skyrocket (and they are), when the powers-that-be decide who gets energy and who doesn't—you'll be standing apart, sovereign and self-reliant.
Let me be clear: I'm not some technical genius. I'm just a regular American who got tired of being at the mercy of fragile infrastructure and corporate whims. If I could build my system, so can you. Let's start the journey.
THE COMFORT ZONE: THE GRID-DEPENDENT LIFE THEY PROGRAMMED YOU FOR
Most of us grew up taking electricity for granted. Flip a switch, the light comes on. Plug in a device, it powers up. The electric bill arrives, you pay it without question. When storms knock out power, you sit in darkness and wait for someone else to fix it. This is the comfort zone—passive, dependent, and increasingly precarious.
I lived this way for decades, blindly trusting in a centralized power grid built over 50 years ago, operated by companies that prioritize shareholder profits over reliability, and increasingly vulnerable to everything from cyberattacks to extreme weather.
The wake-up call came during a brutal ice storm three winters ago. Five days without power. Pipes freezing. Food spoiling. Cell phones dead. The temperature in my house dropped to 42 degrees while I huddled under blankets, waiting helplessly for some utility crew to restore what I had come to see as my right: electricity.
Meanwhile, Frank—my somewhat eccentric neighbor who everyone dismissed as a "prepper"—had lights on. His pipes weren't freezing. His family wasn't eating cold canned beans. The small solar array he'd built himself was providing enough power to maintain essential functions while the rest of us suffered.
That's when it hit me: depending entirely on others for something as essential as power isn't normal—it's surrender. And it's a choice.
THE DISRUPTION: CONFRONTING THE SOLAR INDUSTRY'S BIG LIE
After that ice storm, I began researching solar power. What I discovered shocked me. The solar industry has perpetuated a massive lie: that installing solar is so complex, so dangerous, and so technical that ordinary people shouldn't even consider doing it themselves.
Everywhere I looked, I found the same message: "Leave it to the professionals." "Don't attempt this yourself." "You need specialized training." These warnings were inevitably followed by quotes for installations priced at $20,000, $30,000, or even $40,000.
When I mentioned to an installer that I was considering a DIY approach, his response was immediate and condescending: "I wouldn't recommend that unless you want to burn your house down." Then he tried to sell me on financing that would have me paying off panels for the next 20 years.
Something didn't add up. If solar technology was so impenetrably complex, how were millions of people in developing countries implementing basic systems themselves? If it was so inherently dangerous, why weren't solar homes burning down left and right?
I began digging deeper, pushing past the scare tactics and marketing speak. I found forums and communities of ordinary Americans—teachers, mechanics, nurses, retirees—who had successfully built their own systems for a fraction of the quoted costs. People who weren't electrical engineers or technical wizards, just determined individuals who refused to be told what they couldn't do.
The disruption was complete. I realized the barriers to solar independence weren't technical—they were psychological. The biggest obstacle was simply having the confidence to say: "I can figure this out."
THE REALIZATION: UNDERSTANDING THE FUNDAMENTAL SOLAR TRUTH

As I continued my research, stripping away the industry jargon and complexity, I had a powerful realization: solar energy is ultimately just a series of conversions and connections. Sunlight hits panels, creating DC electricity. That electricity is regulated by a charge controller, stored in batteries, and converted to usable AC power by an inverter.
That's it. That's the fundamental truth that the solar industry obscures with technical terminology and arbitrary complexity.
Once I understood these basic components and their relationships, everything else was just details—important details to be sure, but nothing beyond the comprehension of an average person willing to learn.
THE FOUR CORE COMPONENTS OF ANY SOLAR SYSTEM
1. Solar Panels: Convert sunlight to DC electricity
2. Charge Controller: Regulates the voltage and current from panels to batteries
3. Battery Bank: Stores energy for use when the sun isn't shining
4. Inverter: Converts DC battery power to AC household power
This simple four-part system is the foundation of energy independence. Everything else—mounting hardware, wiring, breakers, meters—supports these core components. Understanding this framework demystifies the entire process.
Most importantly, I realized that building a solar system doesn't have to be an all-or-nothing proposition. You can start small, learn by doing, and expand as your confidence, needs, and budget grow. The key is to begin the journey.
THE RISING CONFLICT: NAVIGATING THE BARRIERS TO SOLAR FREEDOM
Deciding to build my own solar system was one thing. Actually doing it meant confronting several challenges that keep most people locked in grid dependence:
CHALLENGE #1: KNOWLEDGE GAPS AND LEARNING CURVE
Despite my determination, I had to admit that I knew very little about electrical systems. Watts, amps, volts, series connections, parallel wiring—these were concepts I'd have to master to build a safe, effective system.
The solution wasn't paying thousands for a professional, but investing time in systematic learning. I identified the specific knowledge I needed and found resources tailored to beginners—forums, YouTube channels run by experienced DIYers, and basic electrical textbooks. I didn't try to become an expert overnight, but focused on practical understanding.
CHALLENGE #2: CALCULATING TRUE POWER NEEDS
How much solar capacity did I actually need? Industry professionals typically oversize systems to maximize their profits, but underestimating could leave me literally in the dark.
I tackled this by carefully auditing my actual energy usage. I listed every device in my home, found its power consumption (usually on a label or in the manual), and estimated daily use hours. This gave me a baseline in kilowatt-hours (kWh) that I could build around, rather than accepting arbitrary recommendations.
CHALLENGE #3: BUDGET CONSTRAINTS VS. QUALITY REQUIREMENTS
Quality solar components aren't cheap, but neither should they bankrupt you. The market is flooded with both overpriced premium brands and dangerous junk presented as "budget-friendly."
I developed a middle path strategy: investing in quality for critical components (particularly the charge controller and inverter) while finding value on others. I also discovered that buying slightly used or previous-generation components from reputable brands could deliver 90% of the performance at 50% of the cost.
CHALLENGE #4: LOCAL REGULATIONS AND RESTRICTIONS
Perhaps the most insidious barrier to solar independence is the web of regulations, permits, and approvals designed to keep you dependent on the established system.
I researched my local requirements carefully, discovering that many restrictions apply primarily to grid-tied systems. By focusing initially on a standalone system that didn't connect to the grid, I avoided many regulatory hurdles while still building my energy resilience.
Each of these challenges tested my commitment, but also strengthened my resolve. The rising conflict wasn't just with external barriers, but with my own doubts and the lifetime of conditioning that said, "Leave it to the experts."
THE CHOICE: MAKING THE COMMITMENT TO SOLAR SELF-RELIANCE
After weeks of research and preparation, I stood at the decision point. Continue with endless planning and research, or take the leap into action. Analysis paralysis is the silent killer of most DIY solar dreams.
I chose to start building. Not the perfect system. Not the ultimate system. Just a beginning—a practical, expandable foundation for energy independence that would teach me through direct experience.
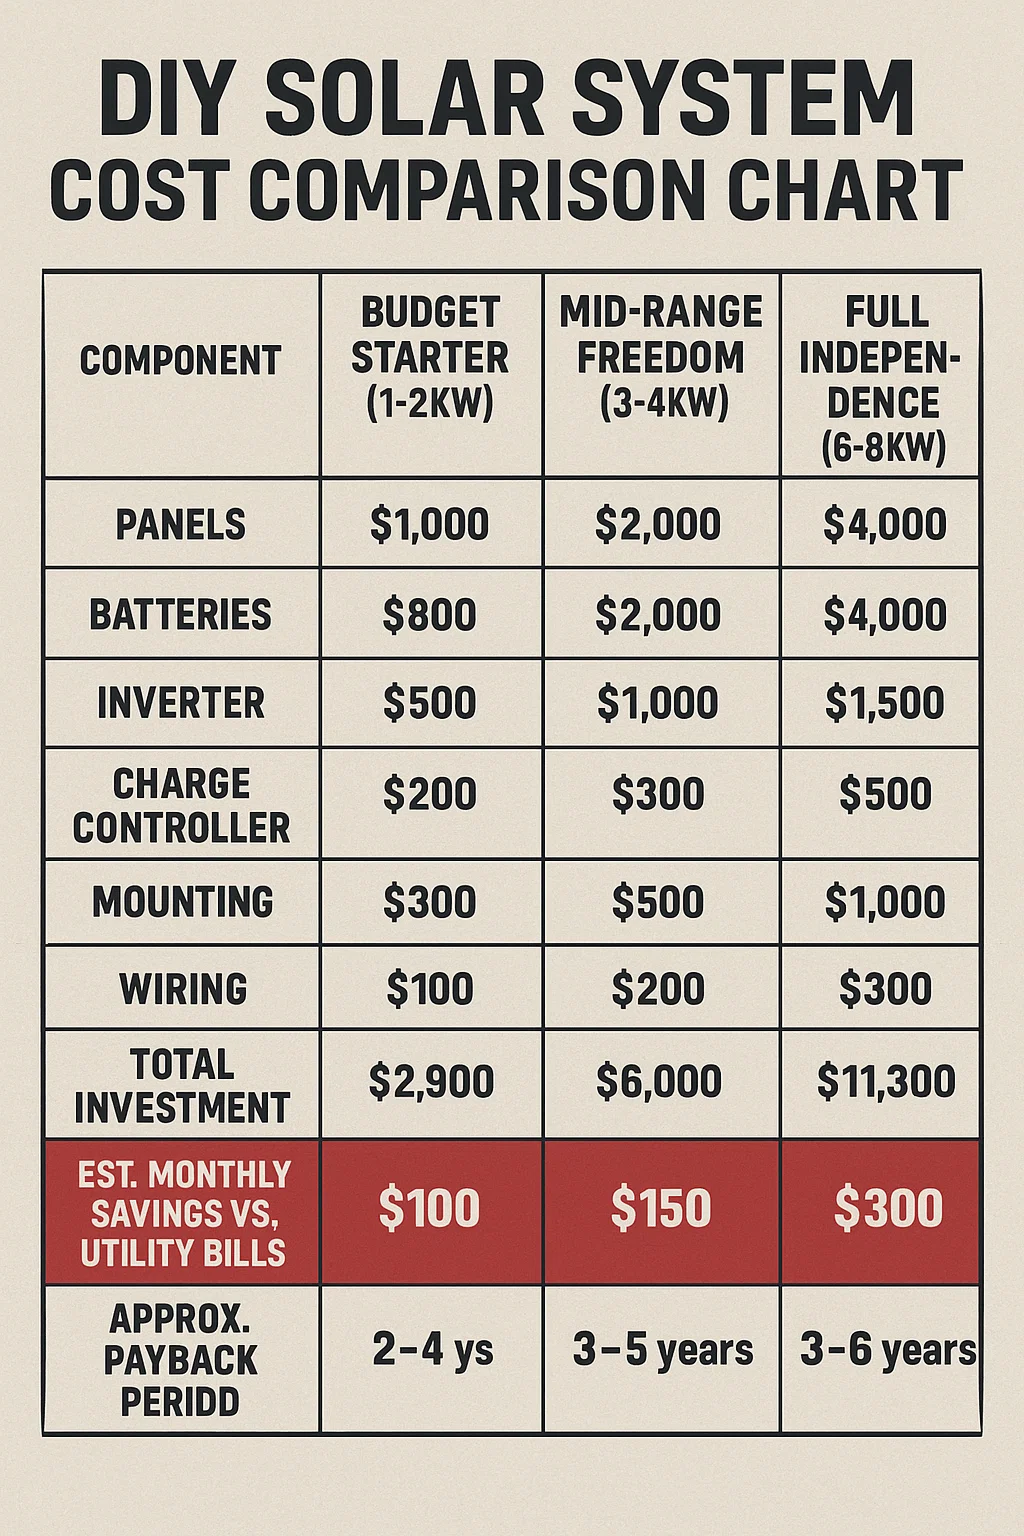
My initial goal was modest: a 1.2 kilowatt system with enough battery storage to run essential circuits during outages. Four 300-watt panels, a quality charge controller, four deep-cycle batteries, and a pure sine wave inverter. Total budget: approximately $3,200—less than 20% of what I'd been quoted for professional installation.
I ordered components, gathered tools, and cleared a weekend for the initial build. The choice was made: I would stop waiting for permission and start generating my own power.
THE TRIAL BY FIRE: BUILDING YOUR FIRST SOLAR SYSTEM
If you're ready to break free from utility dependence, this step-by-step guide will walk you through building your first DIY solar system. I've designed this specifically for beginners with basic tools and no specialized knowledge.
SAFETY FIRST
Solar systems involve electricity and can be dangerous if handled improperly. Always disconnect power sources before working on connections, use insulated tools, and follow safety protocols. This guide focuses on standalone (not grid-tied) systems to minimize complexity and risk.
STEP 1: GATHER YOUR COMPONENTS AND TOOLS
Basic Starter System Components:
- Solar Panels: 3-4 panels (300-400 watts each) to start
- Charge Controller: MPPT type for maximum efficiency (sized for your panels)
- Batteries: Deep-cycle lead-acid or LiFePO4 (lithium iron phosphate)
- Inverter: Pure sine wave, sized to your expected loads
- Mounting Hardware: Appropriate for your installation location
- Electrical Components: MC4 connectors, battery cables, breakers, fuses, combiner box
- Monitoring System: Basic voltage/current meters or monitoring device
Essential Tools:
- Multimeter: For testing voltage and connections
- Wire Cutters/Strippers: For preparing cables
- Basic Hand Tools: Screwdrivers, wrenches, socket set
- Drill and Bits: For mounting hardware
- Safety Equipment: Gloves, safety glasses, non-conductive tools
Start with a "power station" configuration rather than mounting panels on your roof. This plug-and-play approach lets you learn the system's operation before committing to permanent installation. It also avoids many permitting issues.
STEP 2: PLAN YOUR SOLAR PANEL PLACEMENT
Optimal solar generation requires proper panel placement. For fixed panels, a south-facing orientation (in the Northern Hemisphere) at an angle roughly equal to your latitude will maximize year-round production.
Don't overthink this for your starter system. Even panels that aren't perfectly oriented will produce useful power. My first setup had panels simply propped against my south-facing fence at approximately 35 degrees—not ideal, but enough to learn with and provide emergency power.
Permanent mounting options include:
- Ground Mounts: Simplest for beginners, easier to access and maintain
- Roof Mounts: Space-efficient but more complex for installation and maintenance
- Pole Mounts: Allow for adjustable positioning but require more structural work
Whichever location you choose, ensure panels will receive maximum sunlight without shading from trees, buildings, or other obstructions, especially during peak solar hours (10am-2pm).
STEP 3: CONFIGURE YOUR BATTERY BANK
Your battery bank is where solar energy is stored for use when needed. For beginners, I recommend starting with either:
- Lead-Acid Batteries: More affordable upfront but shorter lifespan (3-5 years with proper care). You'll need to maintain electrolyte levels and can typically only discharge to 50% without damage.
- LiFePO4 (Lithium Iron Phosphate): Higher upfront cost but longer lifespan (10+ years), lighter weight, maintenance-free, and can be discharged to 80-90% capacity.
For a basic starter system, four 6V golf cart batteries wired for 12V (or two 12V batteries) will provide approximately 1-2 kWh of usable energy storage—enough to run essentials during short outages.
Proper configuration is critical:
- Batteries in series (positive to negative) increase voltage
- Batteries in parallel (positive to positive, negative to negative) increase capacity
When connecting batteries, always use appropriately sized cables, connect the negative terminal last, and use properly rated fuses or breakers to protect against shorts.
If budget allows, choose LiFePO4 batteries from the start. Though more expensive initially, their superior cycle life, depth of discharge, and maintenance-free operation make them more economical long-term and far less hassle for beginners.
STEP 4: INSTALL THE CHARGE CONTROLLER
The charge controller is the brains of your system, managing power flow from panels to batteries. There are two main types:
- PWM (Pulse Width Modulation): More affordable but less efficient (75-80%)
- MPPT (Maximum Power Point Tracking): More expensive but significantly more efficient (95-98%), especially in less-than-ideal conditions
For a beginner system, I strongly recommend investing in a quality MPPT controller. The efficiency gains will pay for the difference many times over.
Installation steps:
- Mount the controller on a vertical surface near your batteries (but not directly above them to avoid corrosive gases)
- Connect battery cables to the controller first (ALWAYS follow this order to prevent damage)
- Connect solar panel cables to the controller (ensuring proper polarity)
- Configure controller settings according to your battery type and system parameters
STEP 5: CONNECT YOUR INVERTER
The inverter converts DC power from your batteries into AC power that your household devices can use. For a starter system, a 1000-2000 watt pure sine wave inverter will handle most essential needs.
Critical considerations:
- Pure sine wave is essential for sensitive electronics and motors
- Size the inverter for your expected maximum load plus 20% margin
- Use heavy gauge cables (usually 4-2 AWG) for the battery connection
- Install appropriate fuses/breakers between batteries and inverter
For beginners, a standalone inverter (not built into a load center) offers the simplest installation. You can simply plug devices directly into the inverter outlets for testing or emergency use.
As you gain confidence, you can expand to powering specific circuits in your home through a transfer switch or subpanel—but this is an advancement beyond the initial build.
STEP 6: COMPLETE THE WIRING AND CONNECTIONS
Proper wiring is crucial for safety and efficiency. Follow these guidelines:
- Use appropriate wire sizes based on current and distance (oversized is better than undersized)
- Ensure all connections are tight and secure
- Label all wires and components for future reference
- Include proper fusing and/or circuit breakers at all critical points
- Implement proper grounding according to local requirements
The most common beginner mistake is using inadequate wire gauge, especially between batteries and inverter. This creates resistance, reduces efficiency, and can be a fire hazard. When in doubt, go heavier.
STEP 7: TEST AND MONITOR YOUR SYSTEM
Before relying on your new system, thoroughly test its operation:
- Verify solar panels are producing expected voltage/current in full sun
- Confirm charge controller is properly charging batteries
- Test inverter with small loads before connecting critical devices
- Monitor system performance over several days in various conditions
At minimum, install basic voltage and current meters to monitor your system's health. More advanced monitoring solutions can provide detailed performance data and alerts but aren't essential for beginners.
Keep a log of system performance, especially during the first few months. This data will help you identify patterns, troubleshoot issues, and plan expansions.
COMMON BEGINNER MISTAKES TO AVOID
- Undersizing wire gauge between components
- Failing to install proper fuses or breakers
- Mixing battery types or ages in the same bank
- Mounting panels where they'll experience partial shading
- Underestimating actual power consumption needs
- Connecting the charge controller in incorrect sequence
THE FIRST VICTORY: WHEN YOUR DIY SYSTEM POWERS UP
I'll never forget the moment my DIY solar system first came online. After days of planning, gathering components, and careful assembly, I connected the final wire, checked all connections one last time, and flipped the switch.
The charge controller lit up, displaying battery voltage and charging current. The inverter hummed to life, its small cooling fan barely audible. I plugged in a lamp—a simple test load—and watched as light filled the room...light powered entirely by the sun, captured and converted through a system I had built with my own hands.
It wasn't the technical achievement that hit me in that moment, but the profound sense of self-reliance. I had taken a step—however small—toward energy independence. Toward resilience against outages, price hikes, and grid vulnerabilities.
That first night, I ran an extension cord from the inverter to my refrigerator, just to see if the system could handle it. It did, without a hiccup. I stood there in my kitchen, watching the refrigerator run on sunshine I'd harvested hours earlier, feeling a satisfaction that's difficult to describe.
This first victory was modest in technical terms—just 1.2 kilowatts of solar capacity and about 2 kWh of usable battery storage. But psychologically, it was revolutionary. I had proven to myself that energy independence wasn't some unattainable dream or the exclusive domain of technical experts.
That single moment changed my relationship with energy forever. I was no longer just a consumer—I was a producer. No longer dependent, but empowered.
THE TRANSFORMATION: FROM ENERGY CONSUMER TO ENERGY SOVEREIGN
In the months that followed that first successful build, my relationship with energy underwent a profound transformation. I began to see electricity not as a mysterious force that magically appeared from wall outlets, but as a resource I could generate, store, and manage myself.
This shift in perspective changed more than just my power supply—it changed my entire approach to consumption and self-reliance. Here's how that transformation unfolded:
ENERGY AWARENESS
When you generate your own power, you become acutely aware of how much each device actually consumes. I found myself naturally conserving—not out of deprivation, but out of respect for the energy I was harvesting.
I replaced power-hungry appliances with more efficient models. I installed LED lighting throughout my home. I became conscious of "phantom loads"—devices that draw power even when "off"—and began using power strips to truly cut their consumption.
This wasn't about sacrifice; it was about optimization. With each efficiency improvement, my modest solar system became capable of powering more of my real needs.
SYSTEM EXPANSION
The successful basic system gave me the confidence to expand methodically. Over the next year, I added four more panels, doubling my generation capacity. I upgraded to a larger inverter and expanded my battery bank.
Each addition was easier than the last. The learning curve that initially seemed so daunting had become a familiar path. I understood my system intimately because I had built it component by component, making decisions based on actual needs rather than a salesperson's recommendation.
The most significant upgrade came when I installed a manual transfer switch to connect my solar system to my home's essential circuits. This allowed me to power my refrigerator, freezer, some lighting, and communications devices directly through my home's existing wiring during outages.
COMMUNITY IMPACT
Perhaps the most unexpected aspect of my transformation was how it rippled outward. Neighbors who had initially been skeptical became curious as they witnessed my lights staying on during outages.
I began helping friends assess their energy needs and designing basic systems for them. Two neighbors installed their own DIY solar setups with my guidance. A small community of energy independence was taking shape, home by home.
During a major storm last fall that knocked out power to our area for nearly a week, my home became an informal charging station where neighbors could power essential devices and store medication that required refrigeration.
That week demonstrated the real-world impact of energy sovereignty. It wasn't just about personal comfort or saving money—it was about resilience and community support when systems we take for granted break down.
THE CALL TO OTHERS: JOIN THE ENERGY INDEPENDENCETHE CALL TO OTHERS: JOIN THE ENERGY INDEPENDENCE REVOLUTION
If you've read this far, you're likely considering your own journey toward solar self-reliance. Let me speak directly to you: this path is more accessible than you've been led to believe. The technical challenges are real but surmountable. The financial investment is significant but far less than what the industry quotes. The satisfaction and security are priceless.
Here's my call to action for those ready to declare their energy independence:
START SMALL, LEARN DEEPLY
Don't try to replace your entire household power supply immediately. Begin with a modest system—even a single panel connected to a battery. Understand how each component works before scaling up. This approach minimizes both financial risk and technical complexity.
A portable "solar generator" (essentially a battery with built-in inverter and charge controller) paired with a single panel is an excellent first step. Use it to power a few devices, observe its capabilities and limitations, then expand based on that practical experience.
BUILD YOUR KNOWLEDGE BASE
Invest time in learning before investing heavily in equipment. Resources I found particularly valuable include:
- Online forums dedicated to DIY solar (where experienced builders freely share their knowledge)
- YouTube channels with step-by-step builds (watching someone else work through challenges is invaluable)
- Basic books on electrical theory and solar principles (understanding fundamentals prevents major mistakes)
Knowledge is the greatest tool in your arsenal. With it, you can evaluate products, troubleshoot problems, and make informed decisions rather than relying on industry "experts" who often have a financial interest in keeping you dependent.
CONNECT WITH THE DIY SOLAR COMMUNITY
You are not alone in this journey. Thousands of Americans have traveled this path and are willing to share their experience. Find local or online communities of DIY solar enthusiasts. Share your plans, ask questions, learn from others' mistakes.
These communities are typically generous with knowledge and encouragement because they understand what's at stake: not just energy production, but the fundamental right to self-determination in an increasingly uncertain world.
TAKE ACTION NOW
The perfect time to start your solar journey isn't next year or when technology improves further or when you have more money saved. It's now. Begin with education, move to planning, then take the leap into building—even if your first system is modest.
The experience gained from building and operating even a small DIY solar setup will position you far ahead of those who remain entirely dependent on the grid. When the inevitable disruptions come—whether from weather, infrastructure failures, or economic factors—you'll have more options than those who never started.
YOUR PATH TO ENERGY SOVEREIGNTY
Phase 1: Education and planning (1-2 months) - Learn fundamentals, calculate needs, research components
Phase 2: Starter system (weekend build) - 1-4 panels, basic battery bank, standalone power station
Phase 3: System expansion (ongoing) - Add capacity, improve efficiency, integrate with home circuits
Phase 4: Community resilience (sharing) - Help others achieve independence, build neighborhood energy security
Remember that the journey to energy independence isn't just about technical achievements—it's about a fundamental mindset shift from dependence to self-reliance. Each step you take builds not just electrical capacity, but personal capability and confidence.
THE POWER IS YOURS: YOUR SOLAR FUTURE BEGINS TODAY
The powers that be have spent decades convincing us that generating our own power is too complex, too expensive, or too dangerous for ordinary citizens. They've created artificial barriers through regulation, intimidation, and misinformation to maintain their monopoly on this essential resource.
But the truth is now clear: DIY solar energy is within reach for any determined individual willing to learn and work with their hands. The technology has matured. The components are accessible. The knowledge is available. The only missing ingredient is your decision to begin.
My journey from grid-dependent consumer to energy producer has transformed more than just my power supply—it's changed how I view self-reliance in all aspects of life. When the neighborhood goes dark but my lights stay on, I'm reminded that independence isn't given; it's built, one panel and one connection at a time.
Will your journey be without challenges? Of course not. You'll make mistakes, just as I did. You'll have moments of frustration. But you'll also experience the profound satisfaction of creating something essential with your own hands—of declaring your independence from systems that are increasingly fragile and beyond your control.
The question isn't whether you can build your own solar power system. The question is: how much longer will you choose to remain completely dependent on others for something as fundamental as the energy that powers your life?
The grid will fail again. Bills will continue to rise. The security you crave won't come from hoping these systems improve—it will come from developing alternatives you control.
Your first step toward energy sovereignty begins with a simple decision: to stop being merely a consumer and start becoming a producer. Everything else—the learning, the building, the expanding—flows from that initial choice.
What will you choose? Continued dependence on increasingly fragile systems? Or the beginning of a journey toward genuine self-reliance?
The power, in every sense of the word, is yours.
BEGIN YOUR SOLAR INDEPENDENCE JOURNEY TODAY