 TARIFF ALERT: Solar prices rising 25-40% in 2025 - Secure American-made independence NOW
for American Patriots
Battery Bank Wiring: Series vs Parallel (Safety First)
How to wire series, parallel, and series-parallel battery banks correctly.
Wire sizing, torque specs, fusing, and the safety protocols that prevent fires.

Quick Answer:
For battery bank wiring on systems over 1000W, use series configuration to create 24V or 48V. Higher voltage means lower current, smaller wire, and less fire risk. A 3000W load on 48V draws only 62.5 amps (4 AWG wire) versus 250 amps on 12V (4/0 AWG wire). All batteries must be identical. Use a calibrated torque wrench on every connection. Fuse each battery individually.
The Short Version
Battery bank wiring is the most dangerous part of any solar installation. Series wiring adds voltages (4x12V = 48V) with lower current and smaller wire. Parallel wiring adds capacity (4x100Ah = 400Ah) but requires massive wire to handle hundreds of amps. Series-parallel combines both but adds complexity. For systems over 1000W, series is safer and more efficient.
Critical rules: All batteries must be identical. Every connection needs torque-spec tightening. Each battery in a parallel bank needs its own fuse. Any connection more than 20 degrees F above ambient temperature is a fire waiting to happen.
Free DIY Installation Guide
Color-coded battery bank wiring diagrams, wire sizing charts, and safety checklists you can print and take to the shop.
Get the Free Wiring GuideIn This Guide
- Why Battery Bank Wiring Is the Most Dangerous Step
- Series vs Parallel: How to Choose
- Wire Sizing: The Math That Prevents Fires
- Series Wiring Step by Step
- Parallel Wiring Step by Step
- Series-Parallel Combinations
- Essential Safety Equipment
- Testing and Verification
- Troubleshooting Common Problems
- Frequently Asked Questions
Battery Bank Wiring: Key Safety Numbers
- 75% of battery fires are caused by loose connections or undersized wire (Source: NFPA electrical fire data)
- 5,000 degrees F arc flash temperature from a short-circuited battery bank (Source: IEEE arc flash studies)
- 125% current rating required for all wire by NEC code (Article 480)
- 62.5 amps vs 250 amps for the same 3000W load at 48V vs 12V
- 20 degrees F above ambient is the maximum safe connection temperature differential
Why Battery Bank Wiring Is the Most Dangerous Step
We learned this the hard way. During the first system we built after the $15,000 contractor disaster, we under-torqued a parallel connection by hand instead of using a wrench. Three months later, we smelled something burning. The connection had loosened from thermal cycling, resistance had built up, and the terminal was hot enough to melt the battery case.
We caught it in time. Many people do not. Battery bank wiring carries hundreds of amps through connections that must stay tight for 25 years through temperature swings, vibration, and corrosion. One loose bolt at 200 amps generates 40 watts of concentrated heat. That is a soldering iron sitting on your battery terminal, 24 hours a day.
Here is what makes battery bank wiring uniquely dangerous compared to every other part of a solar installation:
- Instant energy release. Batteries discharge their entire stored energy in milliseconds during a short circuit. A wrench dropped across terminals creates an arc flash that reaches 5,000 degrees F.
- No circuit breaker protection. The connection between battery terminals has no overcurrent protection. A fault delivers unlimited current until something melts or catches fire.
- Hydrogen gas production. Lead-acid batteries produce explosive hydrogen during charging. Any spark near a battery bank can cause an explosion.
- Cumulative degradation. Connections that seem fine on day one loosen over months from thermal cycling, creating progressive fire hazards that appear without warning.
Wattson Wisdom:
"I have replaced a lot of components over 14 years. Panels, controllers, inverters. The only component that ever tried to burn my shop down was a battery connection I tightened by feel instead of with a torque wrench. Buy the torque wrench. Use it every time. It is the cheapest fire insurance you will ever own."
Series vs Parallel Battery Bank Wiring: How to Choose
The decision between series and parallel battery bank wiring comes down to one principle: higher voltage is almost always safer and more efficient.
Series Wiring: Voltage Addition
Series battery bank wiring connects the positive terminal of one battery to the negative terminal of the next, creating a chain. This adds voltages while capacity stays the same. Four 12V 100Ah batteries in series produce a 48V 100Ah system.
Parallel Wiring: Capacity Addition
Parallel wiring connects all positive terminals together and all negative terminals together. This adds capacity while voltage stays the same. Four 12V 100Ah batteries in parallel produce a 12V 400Ah system.
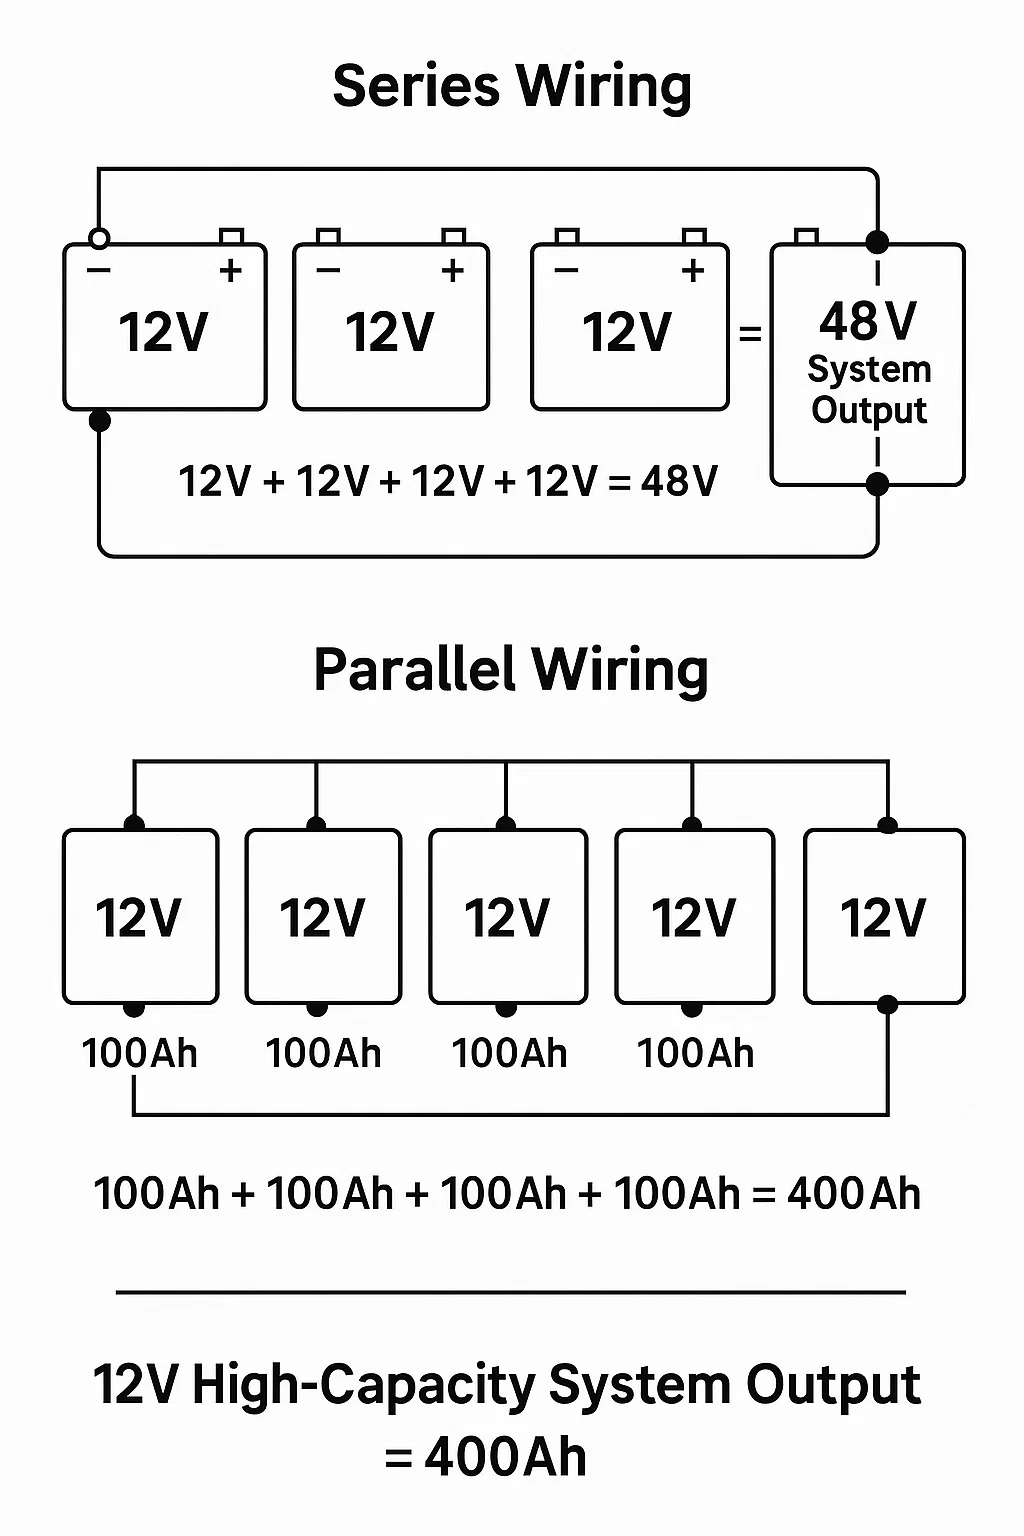
Series vs parallel battery bank wiring configurations showing voltage and current relationships
When to Use Each Configuration
- Series (recommended for 1000W+): Higher voltage means lower current, smaller wire, less heat, reduced fire risk, better efficiency over distance
- Parallel (small systems only): 12V compatibility for RVs, cabins, and marine. Simpler concept but requires massive wire for any real load
- Series-parallel (large systems): Both high voltage and high capacity. Complex wiring and monitoring requirements. Not recommended for beginners.
For a comparison of the batteries themselves, see our Lithium vs Lead-Acid Battery Showdown and our Top 5 Lithium Batteries for Solar Use.
Battery Bank Wiring: The Wire Sizing Math That Prevents Fires
Undersized wire is the number one cause of battery bank fires. The math is not complicated, but getting it wrong is fatal. Here is how to calculate wire size for any battery bank wiring configuration.
The Formula
Current (amps) = Power (watts) / Voltage (volts). Then multiply by 1.25 for the NEC safety margin. Then select wire rated for that amperage from the NEC ampacity table.
Real Numbers for a 3000W Load
- 12V system: 3000W / 12V = 250A x 1.25 = 312.5A minimum. Requires 4/0 AWG copper wire. That is wire thicker than your thumb.
- 24V system: 3000W / 24V = 125A x 1.25 = 156.25A minimum. Requires 2/0 AWG wire.
- 48V system: 3000W / 48V = 62.5A x 1.25 = 78.1A minimum. Requires 4 AWG wire. Standard household wire.
This is why we recommend series wiring for any system over 1000W. The wire savings alone pay for the configuration effort. More importantly, smaller current means less heat at every connection point, which means lower fire risk.
Wire Sizing Rules (Non-Negotiable)
Always rate for 125% of maximum expected current per NEC Article 480.
Derate for temperature. Hot environments (battery rooms above 86F) require the next larger wire size.
Account for voltage drop. Wire runs over 10 feet need the next larger size to prevent efficiency loss.
Use copper only. Aluminum wire corrodes at battery terminal connections and creates high-resistance fire hazards.
For complete system sizing calculations including battery bank wiring requirements, use our Load Assessment Guide.
Series Battery Bank Wiring: Step by Step
Series battery bank wiring creates higher voltages that demand specific safety protocols. This is not just connecting positive to negative. It is building a safe high-voltage DC system that will operate for decades.
Series Wiring Process
- Verify all batteries are identical in type, capacity, voltage, and age. Mixed batteries in series cause voltage imbalances that destroy the weakest battery first.
- Lay out batteries with terminals accessible. You need clear access for initial wiring and future maintenance. Leave 2 inches between batteries for ventilation.
- Connect batteries in sequence, positive of battery 1 to negative of battery 2, and so on through the string. Leave the system terminals (first negative, last positive) disconnected until all connections are torqued.
- Torque every connection to manufacturer specification. Over-torquing cracks terminals. Under-torquing creates fire hazards. There is no "close enough."
- Apply anti-corrosion compound to all terminals after tightening.
- Verify voltage at each connection with a CAT III rated multimeter before connecting to the system.
Essential Tools for Series Battery Bank Wiring
CAT III Rated Multimeter: Standard meters are not safe for 48V+ DC systems. A fault during testing can cause a cheap meter to explode in your hands.
Parallel Battery Bank Wiring: High-Current Safety
Parallel battery bank wiring creates high-current systems that require massive conductors and perfect connections. This configuration is about managing hundreds of amps without creating fire hazards.
Parallel Wiring Process
- Use identical batteries only. Different capacities cause current imbalances. Different ages cause one battery to charge the other, creating heat.
- Install heavy copper bus bars instead of daisy-chaining individual wires. Bus bars distribute current evenly across all connections.
- Make all connections exactly the same length. Unequal wire lengths create current imbalances that overheat shorter runs.
- Torque every connection with a calibrated torque wrench. Parallel connections carry the combined current of every battery. One loose connection carries the load of the entire bank.
- Install individual fuses on each battery. Without individual fusing, a shorted battery draws unlimited current from every other battery in the bank.
Critical Tools for Parallel Battery Bank Wiring
Calibrated Torque Wrench: Parallel connections carry hundreds of amps. One loose connection generates enough heat to melt copper and ignite battery cases. This tool pays for itself the first time it prevents a fire.
CDI Torque Wrench TEKTON Torque Wrench Set
Infrared Thermometer: Scan all connections after installation and monthly thereafter. Any connection more than 20 degrees F above ambient is failing.
Size Your Battery Bank Before You Wire It
Our free solar estimator calculates your exact battery capacity, voltage, and wire sizing requirements.
Get Your Free EstimateSeries-Parallel Battery Bank Wiring
Series-parallel battery bank wiring creates both higher voltage and higher capacity. Wire batteries in series to create voltage strings, then wire the strings in parallel. Example: 8 batteries as 2 parallel strings of 4 series batteries creates a 48V system with double the capacity of a single string.
Requirements for Series-Parallel
- String matching is critical. Each series string must be identical in total voltage and capacity.
- Monitor each string individually. Parallel strings must share current equally. Imbalances indicate a failing battery or connection.
- Both string fuses and individual battery fuses required. Two levels of protection for two levels of wiring.
- Professional installation recommended for systems over 5kW. The troubleshooting complexity exceeds most DIY capabilities.
Monitoring Equipment for Series-Parallel Battery Bank Wiring
Battery Monitor: Continuous monitoring detects imbalances before they cause cascading failures that destroy entire banks.
What Safety Authorities Say About Battery Bank Wiring
"Improper battery connections remain the leading cause of electrical fires in residential energy storage systems. Connection torque verification and regular thermal inspection are the most effective preventive measures."
— National Fire Protection Association (NFPA), NFPA 855 Standard for Energy Storage Systems
"Individual battery overcurrent protection is required for all parallel-connected battery installations. Each battery must have its own fuse or circuit breaker sized for the battery's maximum discharge current."
— National Electrical Code (NEC), Article 480: Storage Batteries
"Arc flash hazards in battery systems increase with both voltage and available fault current. Proper personal protective equipment and de-energization procedures are essential for all battery installation and maintenance work."
— IEEE Standard 1584, Guide for Performing Arc-Flash Hazard Calculations
Essential Safety Equipment for Battery Bank Wiring
Every tool listed here has a specific job in preventing the fires, explosions, and electrocutions that occur when people skip safety equipment to save a few dollars.
Testing Equipment
- CAT III rated multimeter for voltage verification: Fluke 117
- Non-contact voltage tester for verifying de-energized state: Fluke T6-1000
- Infrared thermometer for connection temperature monitoring: Fluke 62 MAX+
Connection Tools
- Calibrated torque wrench for proper connection tightness: CDI 2503MFRPH
- Insulated hand tools rated for DC voltage work
- Cable crimping tool for proper lug terminations
Personal Protective Equipment
- Insulated gloves rated for your system voltage (Class 0 minimum for 48V)
- Safety glasses with side shields (acid splash and arc flash protection)
- Class C fire extinguisher mounted within 10 feet of the battery bank
Non-Negotiable Safety Rules for Battery Bank Wiring
Never create sparks near batteries. Hydrogen gas from charging explodes on contact with any ignition source.
Never work alone. Someone must be present to call emergency services if you are incapacitated.
Remove all jewelry. A ring or watch across battery terminals welds to the metal and causes severe burns.
Install an emergency disconnect accessible from outside the battery room.
Testing and Verifying Your Battery Bank Wiring
Testing is not about confirming your system works. It is about proving it is safe. Every connection, every wire, every fuse gets verified before you energize.
Pre-Energization Checklist
- Continuity test every connection with your multimeter. Open circuits indicate a missed or failed connection.
- Polarity verification at every connection point. Reversed polarity destroys equipment instantly.
- Torque re-verification on every bolt and lug. Connections settle during the first 24 hours.
- Ground fault test to verify no current leaks to the frame or enclosure.
- Visual inspection of every wire for damage, proper routing, and strain relief.
Post-Energization Verification
- Voltage balance check. All parallel strings must read within 0.1V of each other.
- Thermal scan all connections with infrared thermometer after 1 hour of operation under load.
- Current sharing verification. Measure current on each parallel string to confirm equal distribution.
- 24-hour soak test. Monitor the system for a full day before trusting it with your home.
For complete system commissioning procedures, see our Testing Your System: Commissioning and Safety Checks guide.
Troubleshooting Battery Bank Wiring Problems
Voltage Imbalance Between Strings
If parallel strings show different voltages, check connection resistance at every terminal. Measure with your multimeter across each connection — any reading above 0.001 ohms indicates a problem. Clean terminals, re-torque, and retest. If the imbalance persists, one battery is failing and needs replacement.
Hot Connections
Any connection running more than 20 degrees F above ambient is failing. Shut down the system, disconnect the battery bank, clean the connection surfaces, re-torque to specification, and retest under load. If the connection continues to run hot after proper torquing, the terminal or lug is damaged and needs replacement.
When to Call a Professional
- Any smell of burning from the battery area
- Repeated fuse or breaker trips indicating a fault condition
- Visible arcing or sparking at any connection
- Battery swelling, leaking, or discoloration
- Voltage readings that do not make sense after re-checking your meter
If you are beyond your comfort zone, our When to Call a Pro guide helps you decide when DIY ends and professional help begins.
Wattson Wisdom:
"There is no shame in calling a licensed electrician for battery bank wiring. I have been doing this for 14 years, and I still double-check my work with a thermal camera every single time. The guys who skip steps are the ones whose insurance companies ask questions."
Get the Complete Solar Buyer's Guide
Covers battery bank wiring, component selection, installer vetting, and everything else you need before you buy.
Download the Free Buyer's GuideFrequently Asked Questions About Battery Bank Wiring
The Bottom Line on Battery Bank Wiring
Battery bank wiring is the step where shortcuts kill. Every connection carries enough energy to start a fire. Every loose bolt is a timer counting down to a failure you will not see coming until you smell smoke.
The rules are simple: use series for anything over 1000W, keep all batteries identical, torque every connection to spec, fuse every battery individually, and scan your connections with an infrared thermometer monthly. The tools cost a few hundred dollars. The house they protect is worth everything.
We learned battery bank wiring by making mistakes on our own system after the $15,000 contractor disaster. You do not have to learn it that way. Follow the procedures in this guide, use the right tools, and do not skip steps because you are tired or confident. The battery bank does not care how experienced you are. It only cares whether the connection is tight.
Continue Your Installation
- DIY Installation Guide (Pillar Hub) — Complete installation overview
- Inverter Installation: Location, Ventilation, and Safety — Next step after wiring your batteries
- Grounding Your Off-Grid System: NEC Compliance — Required for all installations
- Testing Your System: Commissioning and Safety Checks
- Battery Maintenance Checklist (Print-Friendly)
- Top 5 Lithium Batteries for Solar Use
- Lithium vs Lead-Acid: The Ultimate Showdown
- DIY Solar Panel Installation Guide for Beginners
Questions about battery bank wiring for your specific setup? Our free GPT solar tool provides personalized answers based on your location and system size. For full transparency on how this site earns revenue, see our affiliate disclaimer.
Wattson | US Solar Institute Trained | 14+ Years Off-Grid | Helping families since 2011
OffGrid Power Hub | Est. 2011 | Grid Down, Game On
Battery bank wiring information compiled from NEC code requirements, manufacturer specifications, and 14 years of field installation experience. Updated February 2026. Follow all local electrical codes and obtain proper permits before installation. Battery work carries risk of fire, explosion, and electrocution. When in doubt, hire a licensed electrician. Amazon links are affiliate links. We may earn commission on purchases at no additional cost to you.